
Westinghouse Refrigerator Error Codes
Replacing the water filter
You should change the water filter every six months to ensure the highest possible water quality. If your refrigerator has not been used for a period of time (during a house move for example), change the filter before reinstalling the refrigerator. It is not necessary to turn the water supply off to change the filter. Be ready to wipe up any small amounts of water released during the filter replacement.
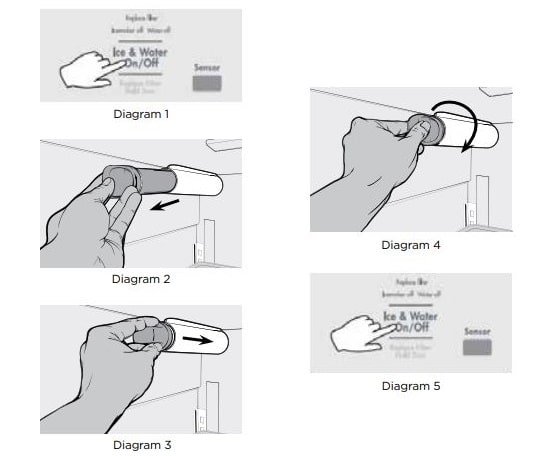
- Ensure that the ice maker is turned off (Diagram 1).
- Remove the filter by turning anti-clockwise 180˚.
- Slide the old water filter cartridge straight out of the housing and discard it. (Diagram 2).
- Unwrap the new filter cartridge and using the alignment guide, slide it gently into filter housing until it stops against the filter connection at the back of the housing. (Diagram 3).
- Engage the filter by firmly rotating clockwise until the filter snaps into position (once engaged the filter cannot be rotated further). (Diagram 4).
- Press a drinking glass against the water dispenser while checking for any leaks at the filter housing. Any spurts and sputters that occur as the system purges air out of the dispenser system are normal.
- After filling one glass of water, continue flushing the system for about four minutes.
- Turn on the ice maker. (Diagram 5).
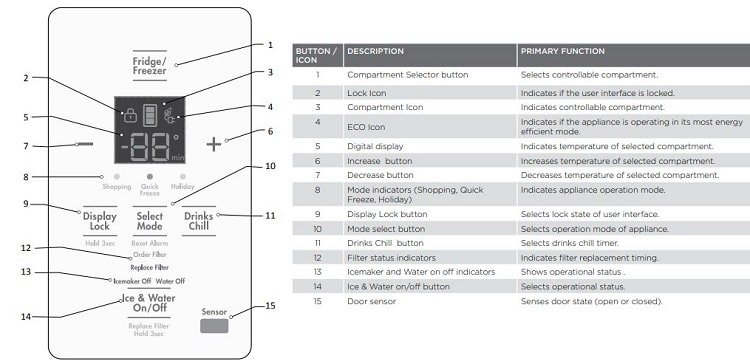
- When the filter has been replaced press and hold the ‘Ice and Water’ button for three seconds to reset the filter replace timer
Westinghouse Refrigerator Troubleshooting
Appliance does not operate at desired temperature. In a modern frost free refrigerator / freezer, cold air is circulated around the various compartments through air vents using a high efficiency fan.
| Trouble | Solution |
|---|---|
| Refrigerator is too warm | Ensure food is allowed to cool before placing inside the refrigerator. |
| Ensure the appliance is set up as per instructions. | |
| Ensure that contents are not obstructing the cooling vents. | |
| Ensure the door is not held open or is being opened too frequently | |
| Freezer is too warm | Adjust temperature to a colder setting. |
| Ensure food is allowed to cool before placing inside the freezer. | |
| Ensure the appliance is set up as per instructions. | |
| Ensure that contents are not obstructing the cooling vents. | |
| Ensure the door is not held open or is being opened too frequently. | |
| Food is freezing in the refrigerator | Adjust temperature to a warmer setting. |
| Ensure that fruit and vegetables are stored in the crisper. Items with a high water content should not be placed near the cooling vents. | |
| Unable to change temperature settings | Refer to Refer to sections “temperature control” and “about the user interface”. Ensure that user interface is in "awake" mode before trying to adjust temperature settings. |
| Motor noise (compressor) | Nothing. This is normal as your new refrigerator uses a high-speed compressor which switches on and off during operation. |
| Note that the compressor noise may seem louder at the start of the on cycle. | |
| A clicking noise heard just before the compressor starts. | Nothing. This is normal as your new refrigerator has an automatic switching action of the temperature control, turning the compressor on and off. |
| Occcasional gurgling, similar to water boiling. | Nothing. As each cycle ends, you may hear a gurgling sound due to the refrigerant flowing in your refrigerator system. |
| Airflow noise. | Nothing, this is normal as your new refrigerator uses high efficiency fans to circulate air. Fan speed and noise may increase during periods of heavy usage or hot weather. |
| Rattling and other noises. | Ensure that the cabinet is level and stable, refer to Installation Instructions. |
| Check the surrounds of the appliance to ensure there is nothing touching or placed on top of the appliance. | |
| Ensure that contents of the appliance are not placed in such a way that they are vibrating (such as bottles). | |
| Excess moisture build up in crisper | Ensure that the crisper is not over packed. |
| Adjust crisper humidity slides. | |
| Crisper bin can not be removed | If crisper bin interferes with the door bins, remove door bins before removing crisper. |
| Position cabinet so that the door can be fully opened. | |
| Freezing items in the crisper | Adjust temperature to a warmer setting. |
| Appliance will not run It is normal for the freezer fan not to operate during the automatic defrost cycle, or for a short time after the appliance is switched on. | Ensure that the cord is plugged into a live power outlet and outlet is switched on. |
| Ensure that the household circuit breaker has not tripped or that the fuse has not blown. | |
| The appliance maybe in defrost mode, check again in half an hour. | |
| Compressor motor seems to run too long At normal room temperatures, expect your motor to run about 40% to 80% of the time. Under warmer conditions, expect it to run even more often. | Ensure that the doors are not held open Check that large amounts of warm food have not just been placed inside the appliance. Note that the appliance will run more than normal just after you install it or when adjusting to temperature setting changes. |
| The exterior of the appliance is warm or hot to touch This is normal because the appliance transfers heat from the inside out through the outer panels and the divider between the doors. | Ensure the appliance has the external clearances recommended in the section “Installing your new appliance”. |
| The exterior of the cabinet will be much warmer on warmer days it may even feel hot to touch, as the appliance is working harder. | |
| User interface will not respond To ensure settings are not accidentally changed the user interface will go into sleep mode when not in use. Press any button to wake user interface. | Check that the user interface is in awake mode, refer to section “About the user interface”. Check that the user interface is not locked, refer to section “About the user interface”. If the user interface is frozen turn the appliance off for five minutes for the memory to clear, then turn back on. Check that the user interface is not in Sabbath Mode, refer to control instructions. (I&W models only). |
| Alarms Sounding | Check that all doors are fully closed. |
| Ensure that the over temperature alarm is not being activated by hot food placed in the freezer. | |
| Check if the drinks timer has ended, refer control instructions. | |
| Check if the Filter Replacement alert is activated, refer control instructions. (I&W models only) | |
| Frost build up | Check that all doors are fully closed. |
| Ensure that the doors are not opened too often. | |
| Ensure that the return air vents are not blocked with packaging. | |
| Ensure the seals are clean and not obstructed. | |
| Odours | The interior may need cleaning, refer to cleaning guide. |
| Ensure that food is stored correctly as some food, containers and wrapping can produce odours. | |
| Check appliance for old or unusual food. | |
| Lights not working The LED lighting is designed to turn on gradually. | Ensure that the cord is plugged into a live power outlet and outlet is switched on. Ensure that the household circuit breaker has not tripped or that the fuse has not blown. Check that the user interface is not in Sabbath Mode, refer to control instructions. Check the appliance features section to determine lighting configuration for your model. |
| Freezer door pops open. | This is normal and should re-close. This happens when the refrigerator door is closed too quickly. If the freezer door stays open, it indicates that the appliance needs to be tilted backwards a little further. Refer to section “Installing your new appliance”. |
| Self close not working. | Check if your appliance has self closing hinges as not all models do. It indicates that the appliance needs to be tilted backwards a little further. Refer to section “Installing your new appliance”. |
| Door not sealing properly | Ensure there is nothing that is preventing the door from closing such as appliance contents or items placed near the appliance. Ensure that the crisper/freezer bin is closed completely. Refit if required as referred to in the section "Using your refrigerator". Ensure the appliance is set up as per recommendations. |
| Door difficult to open and close | If the door is difficult to open just after you have closed it this is due to the pressure equalising, the door will open normally after a few minutes. |
| Ice maker does not produce ice or not enough ice The icemaker is designed to produce a tray of ice approximately every 3 hours, depending on the conditions. | Ensure that the cord is plugged into a live power outlet and outlet is switched on. |
| Ensure that water is connected and turned on and there are no kinks in the water line | |
| Ensure that the Ice Maker is switched on at the user interface refer to "About the User Interface" for details. | |
| Check that the water filter is not blocked or out of date. | |
| Check the water supply flow rate. | |
| If the freezer compartment is too warm, refer to "freezer is too warm" then wait 24 hours for the freezer to reach ideal temperature. | |
| Turn the unit off at the mains and leave for 2 minutes then turn the appliance back on (this will reset the icemaker unit). Check for ice production after 24 hours. | |
| Check that there is no obstruction under the ice maker and ensure the ice bin is fitted correctly. | |
| Water dispenser not functioning | Ensure that the cord is plugged into a live power outlet and outlet is switched on. Ensure that water is connected and turned on and there are no kinks in the water line. Ensure that the Water Dispenser is switched on at the user interface refer to "About the User Interface" for details. Ensure water line is purged refer to “Ice & Water installation”. Check that the water filter is not blocked or out of date. Check the water pressure, refer to “Ice & Water installation” |
| Ice or water has bad odour or taste | Cover food to ensure ice does not absorb foreign odours. |
| Check that the water filter is not out of date | |
| Interior of appliance or ice bin may require cleaning, refer to “Cleaning your refrigerator”. | |
| Discard stale ice monthly and allow ice maker to produce a fresh supply |
Westinghouse Refrigerator User Manual PDF – Top Mount, Bottom Mount, French Door & Single Door