
Samsung Refrigerator Error Codes
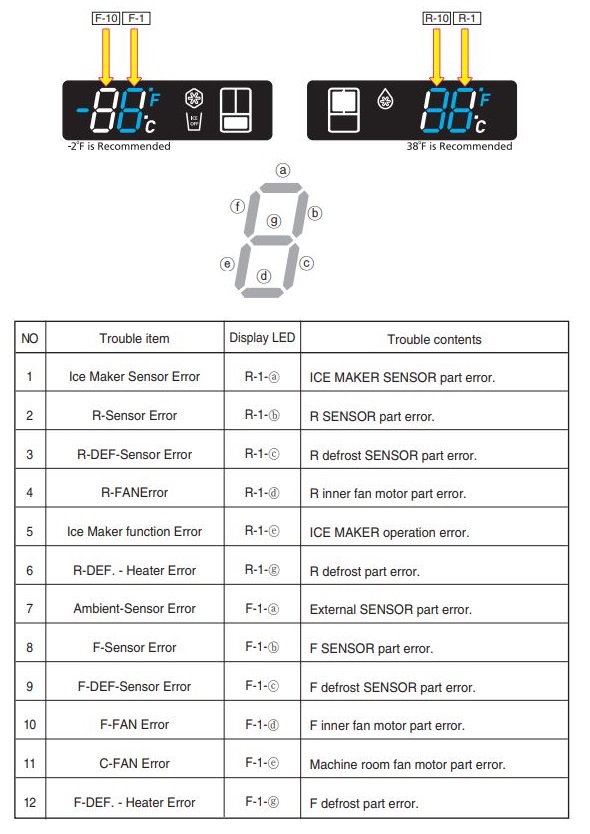
Samsung Refrigerator Load Mode
| Part | DISPLAY LED | Description |
|---|---|---|
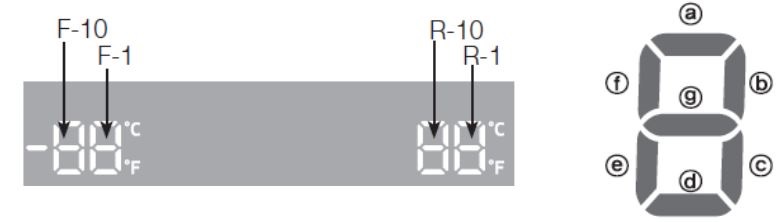
| R-FAN HIGHEST | "a" and "b" at the lowest order digit of the R compartment | In the case of the R-FAN HIGHEST operation, the corresponding LED is turned on. |
| R-FAN HIGH | "a" at the lowest order digit of the R compartment | In the case of the R-FAN HIGH operation, the corresponding LED is turned on. |
| R-FAN LOW | "b" at the lowest order digit of the R compartment | In the case of the R-FAN LOW operation, the corresponding LED is turned on. |
| Overload | "e" at the lowest order digit of the R compartment | If the external air temperature is 34℃ or higher, the corresponding LED is turned on. |
| Low Temperature | "f" at the lowest order digit of the R compartment | If the external air temperature is 21℃ or less, the corresponding LED is turned on. |
| Demo Mode | "g" at the lowest order digit of the R compartment | The LED is turned on in Demo Mode |
| COMP | "a" at the lowest order digit of the F compartment | In the case of the F COMP operation, the corresponding LED is turned on. |
| F-FAN HIGHEST | "b" and "c" at the lowest order digit of the F compartment | In the case of the F-FAN HIGHEST operation, the corresponding LED is turned on. |
| F-FAN HIGH | "b" at the lowest order digit of the F compartment | In the case of the F-FAN HIGH operation, the corresponding LED is turned on. |
| F-FAN LOW | "c" at the lowest order digit of the F compartment | In the case of the F-FAN LOW operation, the corresponding LED is turned on. |
| F compartment defrost heater | "d" at the lowest order digit of the F compartment | The LED is turned on when the freezer defrosting heater operates. |
| C-FAN HIGHEST | "e" and "f" at the lowest order digit of the F compartment | In the case of the C-FAN HIGHEST operation, the corresponding LED is turned on. |
| C-FAN HIGH | "e" at the lowest order digit of the F compartment | In the case of the C-FAN HIGH operation, the corresponding LED is turned on. |
| C-FAN LOW | "f" at the lowest order digit of the F compartment | In the case of the C-FAN LOW operation, the corresponding LED is turned on. |
| F Valve | "b" at the second lowest order digit of the F compartment | In the case of the F valve open, the LED is turned on. |
| CV Valve | "c" at the second lowest order digit of the F compartment | If the CV valve opens, the LED is turned on. |
| R Valve | "f" at the second lowest order digit of the F compartment | If the R valve opens, the LED is turned on |
| French Heater | "g" at the second lowest order digit of the F compartment | In the case of the French Heater operation, the corresponding LED is turned on |
| CV-FAN HIGHEST | “Freezer” or “Thin Ice” for the CV compartment | In the case of the CV-FAN HIGHEST operation, the corresponding LED is turned on. |
| CV-FAN HIGH | “Freezer” for the CV compartment | In the case of the CV-FAN HIGH operation, the corresponding LED is turned on |
| CV-FAN LOW | “Thin Ice” for the CV compartment | In the case of the CV-FAN LOW operation, the corresponding LED is turned on. |
| CV compartment defrosting heater | “Fridge” for the CV compartment | When the CV compartment defrosting heater operates, the LED is turned on. |
| Normal | "e" and "f" in the lowest order digits of the R compartment, and the LEDs are all turned off. | When the external temperature is within the range of 22℃~ 33℃. |
| Ice Room-FAN | "d" at the second lowest order digit of the F compartment | When Ice Room-FAN operates, applicable LED ON. |
| Ice maker full | “e" at the second lowest order digit of the R compartment | When the Ice Maker's Bucket is full, applicable LED ON |
| WiFi | WiFi Status | Not connected to the IP sharer (AP) or the Internet: Off Router(AP) connected: Blink Internet connected: On |

| Error Code | Cause | How to fix |
|---|---|---|
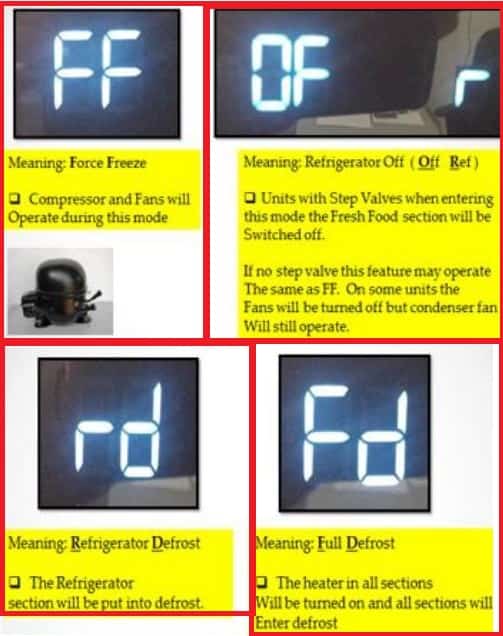
| Flashing OF OF | Cooling Off Mode. | Close the door/wait for the refrigerator to cool down |
| 1 E | Freezer temperature sensor failure | Unplug the refrigerator and check the wire harness connection on the freezer temperature sensor. |
| 2 E | Refrigerator compartment temperature sensor failure | Unplug the refrigerator and check the wire harness connection on the refrigerator compartment temperature sensor. |
| 4 E | Freezer evaporator defrost temperature sensor failure | Unplug the refrigerator and check the wire harness connection on the freezer evaporator defrost temperature sensor. |
| 5 E | Refrigerator evaporator defrost temperature sensor failure | Unplug the refrigerator and check the wire harness connection on the refrigerator evaporator defrost temperature sensor. |
| 6 E | Ambient temperature sensor failure | Unplug the refrigerator and check the wire harness connection on the ambient temperature sensor |
| 7 E | Refrigerator pantry drawer temperature sensor failure | Unplug the refrigerator and check the wire harness connection on the pantry drawer temperature sensor in the refrigerator compartment. |
| 13 E | Humidity sensor failure | Unplug the refrigerator and check the humidity sensor wire harness connection. Reconnect the wire harness if it’s loose. |
| 14 E | Ice maker temperature sensor failure | Unplug the refrigerator and check the ice maker wire harness connection. Reconnect the wire harness if it’s loose. |
| 15 E | Ice room temperature sensor failure | Unplug the refrigerator and check the ice room temperature sensor wire harness connection. |
| 21 E | Freezer evaporator fan failure | Unplug the refrigerator and check the wire harness connections on the freezer evaporator fan |
| 22 E | Refrigerator evaporator fan failure | Unplug the refrigerator and check the wire harness connections on the refrigerator evaporator fan. |
| 23 E | Condenser fan failure | Unplug the refrigerator and check the wire harness connections on the condenser fan. Reconnect any loose wires. |
| 24 E | Freezer evaporator defrost system failure | Freezer evaporator defrost system failure |
| 25 E | Refrigerator evaporator defrost system failure | Unplug the refrigerator and remove the electronic control board cover |
| 26 E | Ice maker failure | Check freezer temperature because the ice maker won’t cycle if freezer temperature is above 15 degrees. |
| 27 E | Pantry drawer air damper heater failure | Unplug the refrigerator and pull out the pantry drawer. |
| 33 E | Ice maker fill tube heater failure | Unplug the refrigerator and remove the electronic control board cover. |
| 41 E or Pc Er | Communication error between the control panel and electronic control board | Unplug the refrigerator and check the wire harness connections between the control panel and the electronic control board. |
| 81 E | Compressor failed to start | Unplug the refrigerator and check the wire harness connections between the inverter board and compressor. |
| 82 E | Inverter board failure | Unplug the refrigerator and check wire harness connections between the electronic control board and inverter control board. |
| 84 E | Compressor locked | Call a service technician to diagnose and repair this failure. |
| 85 E | Voltage supply to the compressor is too low | Call a service technician to diagnose and repair the failure. |
| 86 E | Voltage supply to the compressor is too high | Call a service technician to diagnose and repair the failure. |
| PC ER | Door and main unit disconnection. | 1-Unplug the refrigerator or turn off power at the circuit breaker. 2-Disconnect and reconnect the wire harness above the door. 3-Restore power to the fridge. |
| 41C | 1-Confirm the latest software update has been downloaded and installed. 2-The first time the error occurs after the update, touch OK. |
Samsung Refrigerator Diagnostic Mode

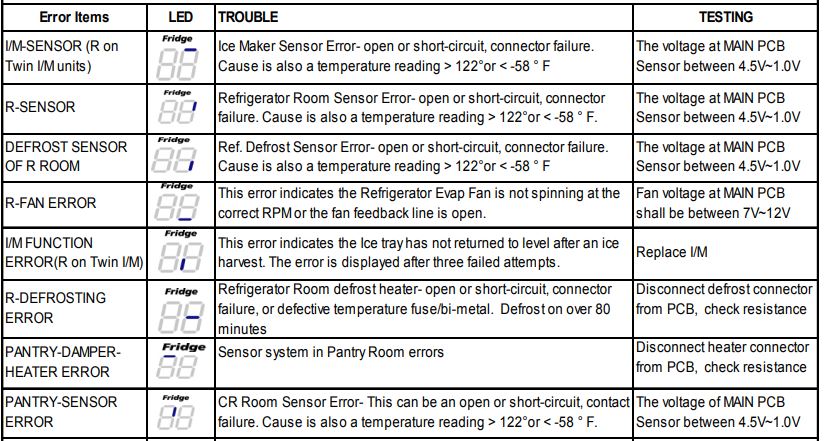
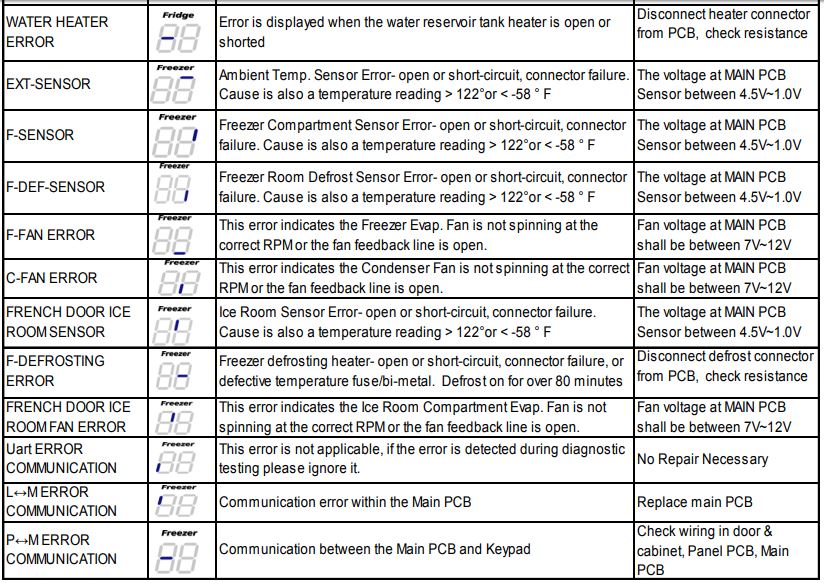
| Error Number | Item | Diagnostic Method |
|---|---|---|
| 1 | Freezer sensor error | Check if the Sensor is Open or Shorted The voltage between the Main PCB CN30 pins 1 and 3 should be within the 4.5V~1.0V range. |
| 2 | Fridge sensor error | Check if the sensor is open or shorted The voltage between the Main PCB CN30 pins 1 and 5 should be within the 4.5V~1.0V range. |
| 3 | Freezer defrost sensor error | Check if the sensor is open or shorted The voltage between the Main PCB CN30 pins 1 and 4 should be within the 4.5V~1.0V range |
| 5 | Fridge defrost sensor error | Check if the sensor is open or shorted The voltage between the Main PCB CN30 pins 1 and 6 should be within the 4.5V~1.0V range. |
| 6 | Ambient sensor error | Check if the sensor is open or shorted The voltage between the Main PCB CN30 pins 1 and 2 should be within the 4.5V~1.0V range. |
| 9 | Convertible zone sensor error | Check if the sensor is open or shorted The voltage between the Main PCB CN30 pins 11 and 12 should be within the 4.1V~0.8V range. |
| 11 | Convertible zone defrost sensor error | Check if the sensor is open or shorted The voltage between the Main PCB CN30 pins 11 and 13 should be within the 4.1V~0.8V range. |
| 13 | Humidity sensor error | The voltage between the Main PCB CN30 pins 7 and 9 should be within the 4.1V~0.8V range. |
| 14 | Fridge Ice maker sensor error | Check if the sensor is open or shorted The voltage between MAIN PCB CN90 3↔ 8 should be within 4.5V~1.0V. |
| 15 | Ice room sensor error | Check if the sensor is open or shorted The voltage between MAIN PCB CN30 10↔ 11should be within 4.5V~1.0V |
| 16 | Fridge humidity sensor error | Check if the sensor is open or shorted The voltage between the Main PCB CN30 pins 7 and 8 should be within the 4.1V~0.8V range. |
| 21 | Freezer fan error | The voltage of the MAIN PCB CN74 1↔4: should be between 7V~12V. |
| 22 | Fridge fan error | The voltage of the MAIN PCB CN74 1↔3: should be between 7V~12V. |
| 23 | Comp room fan error | The voltage of the MAIN PCB CN74 1↔6: should be between 7V~12V. |
| 24 | Freezer defrost error | After separating MAIN PCB CN70_1 wire from PCB, resistance value between CN70_1-7 ↔ 3 shall be 63(230) ohm ± 7%. (Resistance value is varied by input power) 0 ohm : heater short, ∞ ohm : wire/ bimetal open (Must power off) |
| 29 | Convertible zone defrost error | After separating MAIN PCB CN70 wire from PCB, resistance value between CN70_1-7 ↔ 1 shall be 63(230) ohm ± 7%. (Resistance value is varied by input power) 0 ohm : heater short, ∞ ohm : wire/ bimetal open (Must power off) |
| 31 | Convertible zone fan error | The voltage of the MAIN PCB CN74 1↔5: should be between 7V~12V. |
| 35 | Freezer low regist | ERROR_Freezer low regist |
| 37 | Convertible zone low regist | ERROR_Convertible zone low regist |
| 39 | Ice maker function error | After changing the Ice Maker(R), plug the refrigerator power code again, and check the operation. |
| 40 | Ice maker fan error | The voltage of MAIN PCB CN52-1↔ 6: shall be between 7V~12V |
| 41 | MAIN < - > Panel Comm error | Actually, If there is not a problem, it is desirable to replace Main and Panel PCB With the oscilloscope after a cable problem confirming. |
| 44 | MAIN < - > INV Comm error | Actually, If there is not a problem, it is desirable to replace Main and Inverter PCB With the oscilloscope after a cable problem confirming |
| 46 | I/O Expander Comm error | It is desirable to replace Main PCB. |
| 61 | Ice duct heater error | After separating MAIN PCB CN51 wire from PCB, resistance value between CN51 4↔6 shall be 135 ohm ± 7%. (Resistance value is varied by input power) 0 ohm : heater short, ∞ ohm : (Must power off) |
| 65 | Ice bucket heater error | After separating MAIN PCB CN51 wire from PCB, resistance value between CN51 4↔7 wire shall be 135 ohm± 7%. 0 ohm : heater short, ∞ Ohm : wire. |
| 66 | Door handle heater error | After separating MAIN PCB CN51 wire from PCB, resistance value between CN51 1↔2 wire shall be 135 ohm± 7%. 0 ohm : heater short, ∞ Ohm : wire. |
| 71 | Freezer abnormal temp. error | The temperature has been abnormally increased. Check if the door has been open for a long time or if hot food has been stored in the compartment. If the reason for the error is removed, the error code disappears after a pre-determined period of time. |
| 72 | Fridge abnormal temp. error | Check if the door has been open for a long time or if hot food has been stored in the compartment. If the reason for the error is removed, the error code disappears after a predetermined period of time. |
| 73 | Convertible zone chill error | Check if the door has been open for a long time or if hot food has been stored in the compartment. If the reason for the error is removed, the error code disappears after a predetermined period of time. |
| 81 | COMP run error | Check the soldering status of the inverter PCB. (Check if any parts have short-circuited). Check if the DC 15V output is less than 13.5V. Check the Comp and Cycle. |
| 82 | COMP IPM fault | Check the soldering status of the inverter PCB. (Check if any parts have short-circuited). Check if the DC 15V output is less than 13.5V. Check the Comp and Cycle. |
| 83 | COMP current error | Check the compressor wire connections. Check the soldering status of the inverter PCB. (Check if any parts have short-circuited). Check the Comp and Cycle. |
| 84 | COMP Motor stall | Check if the compressor and the Cycle is normal.Check the input voltage. Check the soldering of the inverter PCB. (Check if any parts have shortcircuited.) |
| 85 | COMP low voltage | Check the input voltage. (This error occurs when the input voltage is AC 106 V or lower.) |
Samsung Refrigerator Diagnostic Code Quick Guide
Self-diagnosis CHECK LIST
Samsung Refrigerator Troubleshooting
| PROBLEM | SOLUTION |
|---|---|
| The refrigerator does not work at all or it does not chill sufficiently. | • Check if the power plug is properly connected. • Check if the set temperature on the digital display is warmer than the freezer or fridge inner temperature. If it is, set the freezer or fridge to a colder temperature. • Is the refrigerator in direct sunlight or located near a heat source? If so, it may not be able to cool sufficiently. Install it in a location that is out of direct sunlight and not near a heat source. • Is the back of the refrigerator too close to the wall, preventing proper ventilation? If so, it may not be able to cool sufficiently. Keep it an appropriate distance from the wall. • Is there too much food inside so that the food is blocking the outlet vent? To keep the refrigerator at a suitable temperature, do not fill the refrigerator with too much food. |
| The food in the fridge is frozen. | • Check if the set temperature on the digital display is too low. If so, raise the set temperature inside the refrigerator. • Is the temperature in the room too low? Set the refrigerator warmer. • Did you store food with a high moisture content in the coldest part of the refrigerator or near the cooling outlet vent? Try moving those items to the other shelves in the fridge instead of keeping them in the colder areas or bins. |
| You hear unusual noise or sounds. | • Check if the refrigerator is level and stable. • Is the back of the refrigerator too close to the wall, preventing proper ventilation? • Was anything dropped behind or under the refrigerator? • If you hear a “ticking” sound from inside the refrigerator, this is normal. It occurs because various parts contract or expand in response to temperature changes in the refrigerator interior. • If it sounds as if something is hitting something else inside the refrigerator, this is normal. The sound is caused by the compressor operating at high capacity. |
| The cabinet-door sealing area of the appliance is hot and condensation is occurring. | • Some heat is normal as anti-condensators are installed in the vertical hinged section of the refrigerator to prevent condensation. • Is the refrigerator door ajar? Condensation can occur when you leave the door open for a long time. |
| The ice Maker is not producing ice. | • It may take longer to make ice if it is not sufficiently cool, such as when first installed. • Is the water line connected and the shut-off valve opened? • Did you manually stop the ice making function? • Check if the filter is properly installed. If it is not properly installed, the ice making function may not work. |
| You can hear water bubbling in the refrigerator. | • This is normal. The bubbling comes from refrigerant circulating through the refrigerator |
| There is a bad smell in the refrigerator. | • Check for spoiled food. • Foods with strong odors (for example, fish) should be tightly covered. • Clean out the freezer periodically and throw away any spoiled food. When cleaning the inside of the fridge, store food elsewhere and unplug the appliance. Wipe with a dry dishcloth after 2-3 hours and then circulate air inside the refrigerator. |
| Frost forms on the walls of the freezer. | • Is the air vent blocked? Remove any obstructions so air can circulate freely. • Allow sufficient space between the stored foods for efficient air circulation. • Is the freezer drawer closed properly? If the freezer drawer is not completely closed or is blocked, humidity from outside may enter and cause severe frost to form |
| The water dispenser is not functioning. | • Is the water line connected and the shut-off valve opened? • Has the water supply line tubing been crushed or kinked? • Make sure the tubing is free and clear of any obstruction. • Is the water tank frozen because the fridge temperature is too low? Try selecting a warmer setting on the Digital display. • Is the Child Lock on? • Check if the filter is properly installed. If it is not properly installed, the water dispenser may not work. |
| The auto close system does not work with the freezer door. | • Is there an imbalance between the right and left parts of the door? • Open and close the door smoothly 1~2 times. After you do this, the auto close system usually works properly again. • Try opening the door smoothly to avoid unbalancing the right and the left part of the door. |
| Condensation or water drops forms on vertical mullion and surroundings, etc. | • Condensation or water drops may form if the humidity is too high while the refrigerator is operating. • If condensation or water drops appears on vertical mullion and surroundings, etc., turn the Energy Saver mode off after removing the condensation. |
Samsung Refrigerator Manual PDF
source: www.samsung.com