Logik Refrigerator Error Codes
Considering the Sensor connecting or cutting problem, in order to check the problem easier, we get the display error to distinguish the problem when we design the product. When the digital display window shows ‘E1’ that means the circuit of the temperature sensor inside the cabinet is open circuit or short circuit, When the digital display window shows ‘E2’ that means the circuit of the defrost sensor (evaporator temperature sensor) is open circuit or short circuit. The digital display window shows ‘E3’ that means the temperature sensor inside the cabinet and the defrost sensor occur both fault.
Both sensors are connected on the main board which realize the connection. So when display shows Erro problem, we need to check the sensor itself have problem or not,meanwhile, need to check the connect well or not between the sensors and main board.
| Error Codes | Solution |
|---|---|
| E1 | Checking the connection of main board have problem or not. |
| E2 | Take off the evaporator temperature sensor ,and Measure the resistor , if sensor is bad ,change a new one. |
| E3 | Take off the evaporator temperature sensor ,and Measure the resistor , if sensor is bad ,change a new one. |
| Refrigerator can’t start | Is the power cord connecting well? |
| Is the power voltage too low? | |
| Is the sensor irrational setting? | |
| Is the ambient temperature too low? | |
| Is the circuit on power? | |
| Is there some default in compressor | |
| Is the refrigeration system blocked by ice or dirty, please stop the unit and restart after 10 minutes to see if the compressor can start | |
| Weak cooling effects | Is there any heat source around the refrigerator? |
| Is there enough space around the refrigerator for rejection of heat? | |
| Is the setting of the temperature appropriate? | |
| Is there too much food or overheating food in it? | |
| Does there open the door frequently? | |
| Is the door completely closed? | |
| Does the gasket destroyed or distort? | |
| Does the gas leak? | |
| The unit can not stop running | Is there any heat source around the refrigerator? |
| Is there enough space around the refrigerator for rejection of heat? | |
| Is the setting of the temperature appropriate? | |
| Is there too much food or overheating food in it? | |
| Does there open the door frequently? | |
| Is the door completely closed? | |
| Does the gasket destroyed or distort? | |
| Is the thermostat good operation? | |
| Does the gas leak? | |
| The setting temperature is not reasonable. | Readjust the temperature setting |
| the sensor is bad | Replace the sensor |
| Seal of door is damaged | Replace the gasket |
| Too much food in the refrigerator | Please put the food properly |
| Wind door is broken | Replace wind door |
| Fan motor is broken | Replace fan motor |
| Leakage of Gas | First find out the point of leaking on tube, and then sealed it, vacuuming it, finally recharge with Gas. |
| The quantity of Gas is too much | First stop unit for several minutes, and then open charging tube, discharge all of gas. Change a new filter, and then recharge gas, finally sealed the system. |
| There is air in the liquid cycle system | First stop unit for several minutes, and then open charging tube, discharge all of gas. Change a new filter, and then recharge gas, finally sealed the system. |
| Low working efficiency of compressor | Change a new compressor. |
| There is something that blocked the liquid cycle system | Change a new filter |
Maintenance
Changing the Internal Light: The internal light is a LED light. It cannot be changed by the user; please contact your service agent.
Care When Handling / Moving the Unit
Hold the unit around its sides or base when moving it. Under no circumstances should it be lifted by holding the edges of the top surface.
Servicing
The unit should be serviced by an authorised engineer and only genuine spare parts should be used. Under no circumstances should you attempt to repair the unit yourself. Repairs carried out by inexperienced persons may cause injury or serious malfunction. Contact a qualified technician.
Switching Off for Long Periods of Time
When the unit is not in use for a long period of time, disconnect it from the mains supply, empty all food and clean the unit, leaving the door ajar to prevent unpleasant smells.
Cleaning
Defrosting
The freezer compartment of this unit is frost-free. With proper use, there should not be any frost accumulated.
However, in case of improper use of the freezer compartment, frost might build up in the freezer compartment after the unit has been used for a period of time. Scrape e away the frost using a plastic scraper (not included).
We recommend that defrosting should be carried out when the frost layer builds up to 10mm (~0.39”). Choose a time when the stock of frozen food is low, follow these procedures:
- Take out the food, turn the unit off at the mains supply and leave the door open. Ideally, the frozen food should be put into another freezer. If this is not possible, wrap the food in several sheets of newspaper or large towels and then a thick blanket to keep it cool.
- Place a shallow bowl or pan below the freezer compartment. Scrape e away the frost using the plastic scraper. Defrosting the remaining frost can be speeded up by placing a bowl of hot water inside the freezer compartment cabinet and closing the door. As the solid frost loosens, scrape e it away with the plastic scrape and remove.
- When defrosting is complete, clean your unit’s interior and exterior.
Cleaning the Interior and the Exterior of the Unit
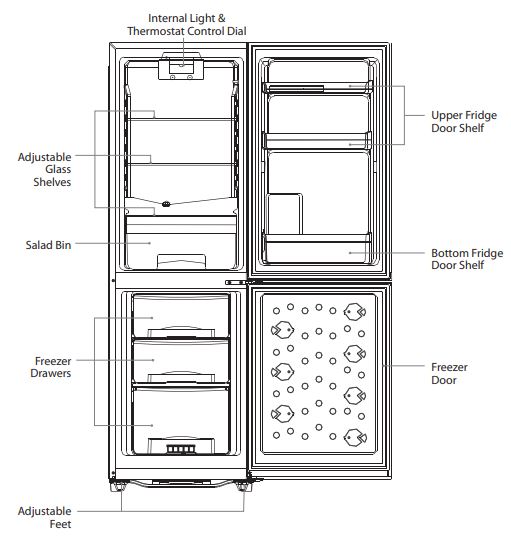
- Remove all the shelves, drawers and salad bin before cleaning. To remove the salad bin first remove the lower fridge door shelf.
- Wipe the inside of the unit with a weak solution of bicarbonate soda and then rinse with warm water using a ‘wrung-out’ sponge or cloth. Wipe completely dry before replacing the shelves, drawers and salad bin.
- Use a damp cloth to clean the exterior, and then wipe with a standard furniture polish. Make sure that the doors are closed to avoid the polish getting on the magnetic door seals or inside the fridge/freezer compartments.
- The grille of the condenser at the back of the unit and the adjacent components can be vacuumed using a soft brush attachment.